

Este Luvah Forest – Adan Ruins Walkthrough
This is the main story walkthrough and strategy guide for Este Luvah Forest – Adan Ruins in Tales of Arise. Included also are lists of playable characters, obtainable items and collectibles, and normal and boss enemies.
Characters
Here are the playable characters in this walkthrough:
| Character | Availability |
|---|---|
| Alphen |
All Locations |
| Shionne |
All Locations |
| Rinwell |
All Locations |
| Law |
All Locations |
| Kisara |
All Locations |
| Dohalim |
All Locations |
Obtainable Items
Here is a list of items obtainable in this walkthrough:
| Item | Location |
|---|---|
| Protect Ring x1 | Este Luvah Forest Fortress Ruins |
| Magical Tunic x1 | Este Luvah Forest Fortress Ruins |
Boss Enemies
Here is a list of boss enemies encountered in this walkthrough:
| Boss | Level | Type | Location |
|---|---|---|---|
| Temararus | 28 | Este Luvah Forest Fortress Ruins | |
| Grinymuk | 29 | Niez |
Este Luvah Forest – Adan Ruins Walkthrough
Please note that this walkthrough is still undergoing updates.
Este Luvah Forest Fortress Ruins
| 1 | Examine the elevator. Afterwards, drop down from the ledge all the way to B4F. |
|---|---|
| 2 | From where you land at B4F, follow the path where the zeugles are. Take out the enemies along the way and continue to the end of the room. Open the chest to get 8500 Gald. |
| 3 | In the other room is the generator you need to operate. This will activate the elevator to travel to B3F and B4F. |
| 4 | Ride the elevator to B3F. Then, follow the path going to the right to get 2200 Gald. |
| 5 | Head back to the elevator and go north this time to find a chest with Protect Ring x1. Then, backtrack again to the elevator and go left to find another generator. Activate it and go up to B1F. |
| 6 | Go left and enter the rooms there. Pick up Magical Tunic x1. Then, head for the the path going south. Approach the bed to get Orange Gel x1. |
| 7 | On the path to the far north is a chest with Lizard Fin x2. From here, backtrack to the elevator and drop down on the north side to reach B2F. |
| 8 | When you reach B2F, head to the path going south. Use the healing light to fully restore the party’s HP. When you are ready, head to the end of the path and prepare to battle Temararus. |
| 9 | Focus your attacks on Temararus’ weakpoint (the glowing crystal on its tail). Destroying will trigger a Core Break, allowing you to unload on the boss while it is defenseless for a brief period.
Equipping Garnet (accessory) is useful for defending against the boss fire attacks which it will do often when you are at a distance. Have Dohalim use his boost attack on the boss as well to hinder his mobility. Note that this will no longer be effective when Temararus is at half health or lower. The boss will summon two minions when its HP is reduce to half. You can choose to focus all attacks on the boss or take care of the minions to make the fight more manageable. |
| 10 | Watch the cutscene. Then, travel back to Niez. |
Niez
| 1 | Watch the cutscene. Then, rest at the inn. |
|---|---|
| 2 | Prepare to battle Grinymuk. |
| 3 | As with Temararus’, focus on dealing damage to Grinymuk’s tail (its weak point indicated by the glowing part). Trigger a Core Break to give you a chance to land follow-up attacks and build your combo for Boost Strikes.
Garnet and Opal (accessories) will also help you in the fight as the boss has access to both fire and wind attacks. Grinymuk is weak to the earth element, making Dohalim very strong against this boss. Pummel him with artes to deal massive damage. When the boss thrusts its tail, it will summon a massive tornado that lingers on the battlefield for a while. Run away while keeping both the tornado and the boss in view to avoid getting hit by either of them. |
| 4 | After defeating Grinymuk, watch the cutscene. |
| 5 | Afterwards, head to Adan Ruins by fast traveling to Aqfotle Hills and taking the southwest exit. |
Adan Ruins
| 1 | Upon entering Adan Ruins, go past the group of zeugles and down to the right to find Owl near the railing. |
|---|---|
| 2 | Start making your way to the southwest section of the map to reach the Hidden Wharf. Feel free to talk transact with the merchant. Afterwards, rest at the campsite. |
| 3 | When you reach the wharf, open the chest there to get Heavy Treat x1. |
| 4 | Talk to the man at the docks to go after Mobile Fortress Gradia. |
| << Niez – Aqfotle Hills | Mobile Fortress Gradia >> |
Item Locations
Below are the in-game locations of the obtainable items in this walkthrough:
Coming soon.
Owl Locations
Below are the in-game locations of all owls in this walkthrough:
| Owl | Map | In-game |
|---|---|---|
| #25 (Adan Ruins) | 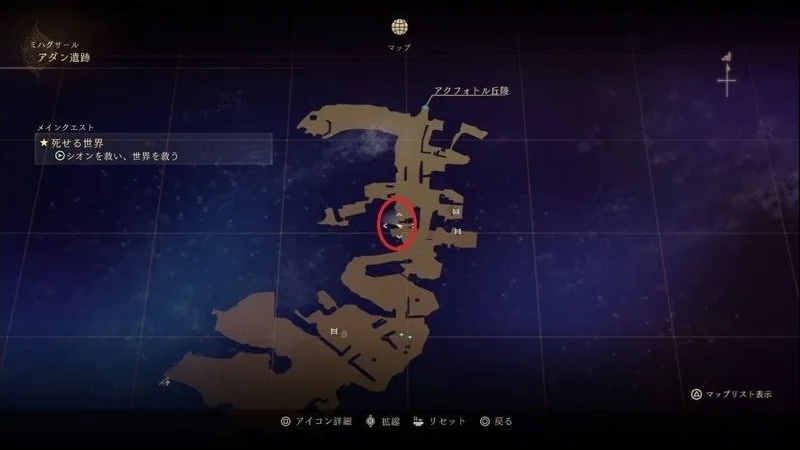 |
 |
Explored Locations
Coming soon.
Leave a Reply