

Peregion – Del Fharis Castle Walkthrough
This is the main story walkthrough and strategy guide for Peregion – Del Fharis Castle in Tales of Arise. Included also are lists of playable characters, obtainable items and collectibles, and normal and boss enemies.
Characters
Here are the playable characters in this walkthrough:
| Character | Availability |
|---|---|
| Alphen |
All Locations |
| Shionne |
Del Fharis Castle |
| Rinwell |
All Locations |
| Law |
All Locations |
| Kisara |
All Locations |
| Dohalim |
All Locations |
Obtainable Items
Here is a list of items obtainable in this walkthrough:
| Item | Location |
|---|---|
| Jet Black Vest x1 | Del Fharis Castle – South Tower |
| Battle Suit x1 | Battle Suit x1 |
Boss Enemies
Here is a list of boss enemies encountered in this walkthrough:
| Boss | Level | Type | Location |
|---|---|---|---|
| Kalmarzel | 34 | Del Fharis Castle – Hanging Gardens | |
| Kaldinzel | 34 | Del Fharis Castle – Hanging Gardens | |
| Lord Vholran Igniseri | 35 | Del Fharis Castle – Lord’s Chamber |
Peregion – Del Fharis Castle Walkthrough
Please note that this walkthrough is still undergoing updates.
Peregion
| 1 | Follow the path to Del Fharis Castle and watch the cutscene. |
|---|---|
| 2 | Defeat the enemies along the way. Afterwards, enter Del Fharis Castle. |
Del Fharis Castle
| 1 | From the starting location of the castle, head for the door to reach the Main Tower. |
|---|---|
| 2 | Follow the path going left and go inside the room. Take out the enemies and open the chest to get 14100 Gald. |
| 3 | Head back and break the ice using Alphen’s special action. |
| 4 | Take the path going left to South Tower. Head into the first room and defeat the guards. Afterwards, open the chest to get Jet Black Vest x1. |
| 5 | Move further toward the hallway while taking out more enemies. |
| 6 | Enter the door to reach South Tower 1F. Check the rooms at the hallway to find 1550 Gald, 7650 Gald, Beef x3, and Battle Suit Armor x1. |
| 7 | When you come up to another ice barrier in front of the path to Central Entrance Plaza, destroy it using Alphen’s special ability. Then, pass through the doors. Open the chest at the end to get Silk Robe x1. |
| 8 | Backtrack to South Tower through the doors and follow the path to the staircase. Get Orange Gel x1 and go up to the South Tower 2F. |
| 9 | When you reach the top, take out the enemy there and open the chest to get Lemon Gel x1. Afterwards, pass through the doors going north reach Central Entrance Plaza 2F. |
| 10 | Head west to reach the control mechanism and use it to operate the drawbridge on 1F. Afterwards, head further along the path and open the chest to get Heavy Treat x1. |
| 11 | Afterwards, backtrack to the mechanism and drop down to 1F. Then, follow the path going to the North Tower 1F. |
| 12 | From the hallway, go inside the room on your right to get Elixir x1 inside a chest. Leave the room and go in the room just across to get Red Chamomile x1. |
| 13 | Exit the room and move ahead along the hall. Take out the enemies ahead and open the chest to get Pineapple Gel x1. |
| 14 | Go up the stairs and defeat more enemies until you come to path that stretches to the left. There is also some stairs to your right but ignore it first. |
| 15 | Head to the path going left first and destroy the ice barrier using Alphen. Enter the door to reach Central Entrance Plaza 3F and walk southeast to the end to find Omega Elixir inside a chest. |
| 16 | Backtrack northeast and go up the stairs. Take out the enemy ahead go through the door leading to Central Entrance Plaza 4F. |
| 17 | Approach the mechanism and use it. Then, open the chest nearby to get Life Bottle x3. |
| 18 | Drop down to 1F from the mechanism above and cross the drawbridge. |
| 19 | Go up the stairs and defeat the enemies on your way to the elevator on 4F Central Entrance Plaza. |
| 20 | Use the healing light near the elevator to fully restore the party’s HP. Afterwards, look up to the ceiling directly across to find Owl #32 (Owl #31 will only be found after defeating the 5th Lord so you will need to come back to Pelegion later). |
| 21 | Use the elevator to reach the Hanging Gardens. |
| 22 | Prepare to battle Kalmarzel and Kaldinzel. |
| 23 | Only Kalmarzel will be present when the fight starts. Kaldinzel will appear when you have lowered Kalmarzel’s HP to half.
Defeating either of the two monsters will greatly strengthen the one that remains and will heal them as well. For an easier time during the fight, focus attacks on Kalmarzel until his HP is lowered to 50%, summoning Kaldinzel in the arena. Afterwards, focus on lowering Kaldinzel’s HP to half before finishing off Kalmarzel. |
| 24 | After defeating the boss duo, head toward the elevator and open the chest on either side to get Gold Gel x1 and Omega Elixir x1. |
| 25 | Free to fast travel back to Lavtu Marshlands if you need to make more preparations before going up the elevator. Having equipment to reduce water damage (especially Garnet) will be very useful for the boss ahead. |
| 26 | Use the elevator to reach the Rooftop Corridor. |
| 27 | Watch the cutscene. Afterwards, prepare to battle Vholran. |
| 28 | Vholran will always target the character you are currently controlling. His ice spells can also immobilize any targets that get hit so stay on the move at all times.
Law and Dohalim can perform a dual boost attack to stagger Vholran. Watch for the timing to use it to give you a big opening to unload on Vholran before he can recover. Vhorlan will eventually use Lex Talionis when he enters Over Limit. When he starts winding up the attack, observe the ground to know the safe spots to avoid getting hit by the damaging pillars of water. Be sure keep an eye on Vhoran himself during this attack as he will often use it to rush at you. When Vholran is at half HP, Rinwell, Shionne, and Kisara will be able to use a special boost attack to stagger Vholran again. Be sure to use it when it becomes available. When Vholran’s HP is lowered to less than half, he will start using Finis Aternam. You can perfect dodge the attack to avoid getting hit when you see the large sword of ice pierce the ground. If you stay further away from the center of the arena, time your dodge when you see the spikes of ice spread at into your direction. |
| After defeating Vholran, watch the cutscene. |
| << Aureum Falls – Lavtu Marshlands | Pelegion (Revisit) – Forland Mountains >> |
Item Locations
Below are the in-game locations of the obtainable items in this walkthrough:
Coming soon.
Owl Locations
Below are the in-game locations of all owls in this walkthrough:
| Owl | Map | In-game |
|---|---|---|
| #32 (Del Fharis Castle 4F Central Entrance Plaza ) | 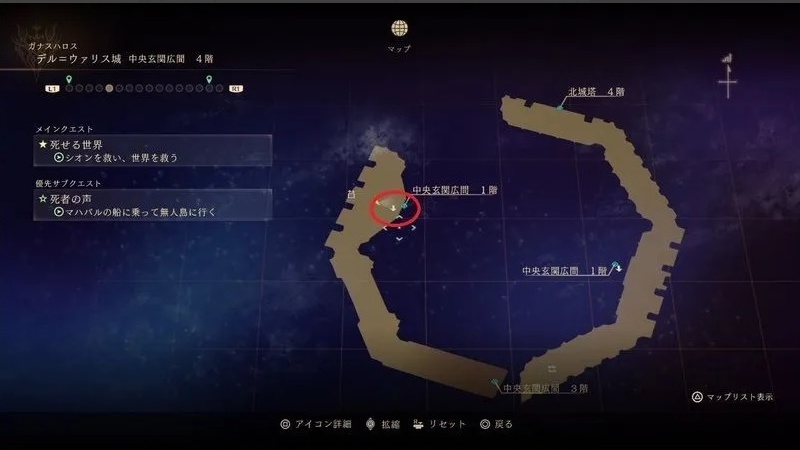 |
 |
Explored Locations
Coming soon.
Leave a Reply