

Kyrd Garrison – Glanymede Castle Walkthrough
This is the main story walkthrough and strategy guide for Kyrd Garrison – Glanymede Castle in Tales of Arise. Included also are lists of playable characters, obtainable items and collectibles, and normal and boss enemies.
Characters
Here are the playable characters in this walkthrough:
| Character | Availability |
|---|---|
| Alphen |
All Locations |
| Shionne |
All Locations |
Obtainable Items
Here is a list of notable items you can obtain in this walkthrough:
| Item | Location |
|---|---|
| Grilled Mushroom Recipe x1 | Kyrd Garrison (inside the Calaglia outpost southwest of Mosgul) |
| Bone Fragment Armor x1 | 2F – Glanymede Castle (southern room blocked by a wall of flames) |
| Warrior Emblem x1 | 2F – Glanymede Castle (northeastern room blocked by a wall of flames) |
| Savage Key (Key Item) | 3F – Glanymede Castle (after defeating the Calaglia Armored Swordsman threatening the child). |
| Castle Elevator Key | 3F – Glanymede Castle (inside the room to the east). |
| Astral Flower x1 | 4F – Glanymede Castle (obtained after defeating the Toxidillo Gigant Zeugle). |
| Astral Crystal Grain x1 | 4F – Glanymede Catle (in a chest in the room to the southeast). |
| Emissary of Liberation (Alphen) | Obtained after defeating Balseph. |
Normal Enemies
Here is a list of enemies encountered in this walkthrough:
| Enemy | Level | Type | Location |
|---|---|---|---|
| Wolf | 7 | Kyrd Garrison, 1F/2F – Glanymede Castle | |
| Calaglia Armored Swordsman | 10 | Kyrd Garrison, Mosgul, 1F/2F/3F – Glanymede Castle | |
| Armadillo | 7 | Kyrd Garrison, 2F – Glanymede Castle | |
| Bee | 8 | Kyrd Garrison, 1F/2F – Glanymede Castle | |
| Toxidillo (Gigant) | 13 | 4F – Glanymede Castle |
Boss Enemies
Here is a list of boss enemies encountered in this walkthrough:
| Boss | Level | Type | Location |
|---|---|---|---|
| Lord Balseph | 15 | Glanymede Castle Lord’s Chamber | |
| Fire Avatar | 34 | Glanymede Castle Lord’s Chamber |
Kyrd Garrison – Glanymede Castle Walkthrough
Please note that this walkthrough is still undergoing updates.
Make Your Way to Mosgul from Kyrd Garrison
Ulzebek – Kyrd Garrison – Mosgul
| 1 | Exit Ulzebek through the gate to the northeast. |
|---|---|
| 2 | After reaching Kyrd Garrison, go south to find some enemies (Wolves) you can take out. Afterwards, gather some Pepper x3 from the plants behind where the wolves were. You can find more of the plants around the area as well. |
| 3 | Continue going south and defeat the enemies along the way (Wolf x2, Calaglia Armored Swordsman x2). |
| 4 | Continue going south until you come up to an outpost to the east. Open the chests there to get Scrap Meat x1 and 500 gald. |
| 5 | Exit the outpost and backtrack all the way northwest. Follow the train tracks and defeat the enemies along the way. |
| 6 | Go up the tower by climbing the ladder to get 100 gald. |
| 7 | Climb back down and go up the vines along the cliff wall to the north. Take out the enemies and get Apple Gel x1 near the edge. |
| 8 | Jump back down and go south to find some Armored Soldiers and a Wolf guarding an outpost to your right. Take them out and enter the outpost. Open the chest inside to get Grilled Mushroom Recipe. |
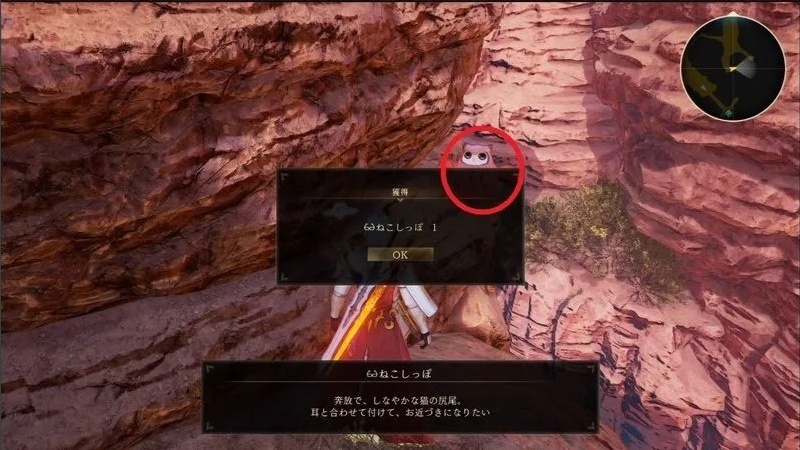
| 9 | Exit the outpost and continue along the tracks toward Mosgul. Just before the gate, follow the path to opens up on your left to find the Owl #4 sitting on a rock. Afterwards, backtrack and enter Mosgul. |
| 10 | Defeat the Armored Swordsman. Afterwards, watch the cutscene. |
Save the Residents of Mosgul – Return to Ulzebek
Mosgul – Ulzebek
| 1 | Head northeast. Alphen will stop by the stairs. Afterwards, go up the stairs to the south defeat the Armored Swordsman. |
|---|---|
| 2 | Watch the cutscene. Afterwards, go south of the area to find a brick wall where Owl #5 can be found. Then, fast travel back to Ulzebek. |
| 3 | Watch the cutscene. The Forging from Scratch Sub Quest will automatically be activated which simply requires you to visit the Blacksmith at the inn. Do so to get some money and SP. |
| 4 | Head back to the Crimson Crows’ hideout and talk to Zephyr. |
Take the Kyrd Garrison Elevator to the Castle
Kyrd Garrison – Castle Gates – Trench of Flames
| 1 | Fast travel to Kyrd Garrison and go northeast. Use the elevator to go to the Castle Gates – Trench of Flames. |
|---|---|
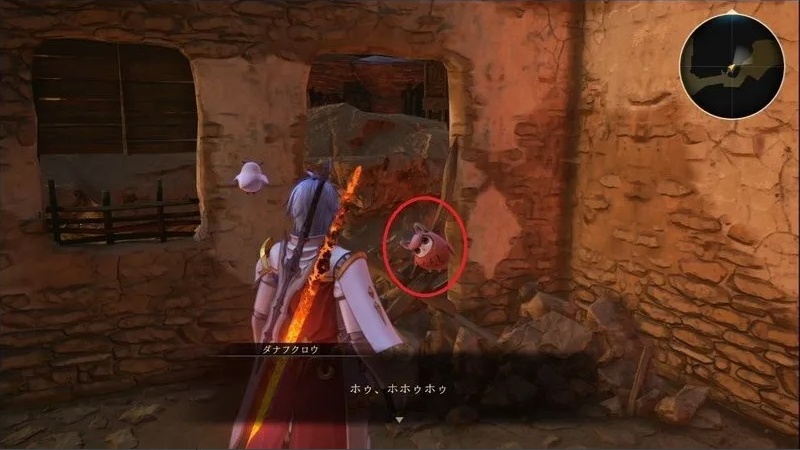
| 2 | Follow the straight path forward and turn right when the path opens up to the east. There is a house to your left where Owl #6 can be found. Then, follow the train tracks to the Gates of Fire. |
Infiltrate the Castle from the Back Entrance
Gates of Fire – East Side
| 1 | Follow the tracks going north and you should see a broken mesh fence to your right (east). Approach it to find Owl #7. Then, continue following the tracks east to reach the East Side. Ignore the door to your right since it is locked and keep following the tracks. |
|---|---|
| 2 | When you reach the end of the path, turn left and descend the metal platform covered in red vines. |
| 2 | Walk on the large tube to get across and enter the castle’s back door. |
| 3 | Watch the cutscene. Afterwards, you will get the Blazing Sword title. |
Search Around the Castle
1F – Glanymede Castle
| 1 | Move forward toward the Calaglia Armored Swordsman. |
|---|---|
| 2 | Read the tutorial on Alphen’s perk and defeat the Calaglia Armored Swordsman x1. |
| 3 | Extinguish the wall of fire using the Blazing Sword (costs 8 CP). |
| 4 | Watch the cutscene. |
| 5 | Move forward and defeat enemies (Calaglia Armored Swordsman x3, Wolf x1). |
| 6 | Defeat the Wolves x2 ahead. |
| 7 | Go south and pick up Apple Gel x1 near the barrels. Then, examine the lift for a cutscene. |
| 8 | Head for the west exit. |
2F – Glanymede Castle
| 1 | Move forward and defeat the enemies (Wolves x2). Afterwards, pick up Scrap Meat x1 near the barrels. |
|---|---|
| 2 | Turn south and us the Blazing Sword to extinguish the flames. |
| 3 | Open the chest ahead to get Bone Fragment Armor x1. |
| 4 | Turn around and go north. Defeat the enemies (Armadillos x2) along the way. |
| 5 | Head to the northwest corner and get Almandine Mass x2 and Iron Chunk x1 from the mineral deposit. |
| 6 | Turn around and start moving east. Defeat the enemies (Calaglia Armored Swordsman x1, Wolf x1). |
| 7 | Extinguish the flames to the northeast using the Blazing Sword. Move forward and open the chest to get Warrior Emblem x1. |
| 8 | Turn around and start going south. Take out the enemies (Bees x2) along the way. |
| 9 | Pick up Apple Gel x1 on the southwest corner near the barrels. Then, exit to the southeast. |
3F – Glanymede Castle
| 1 | Move forward and watch the cutscene. Afterwards, take out the Calaglia Armored Swordsman threatening the child. |
|---|---|
| 2 | Afterwards, you will get the Savage Key and Thorny Woman title for Shionne. Read the tutorial on Shionne’s perk as well. |
Defeat Lord Balseph and Liberate Calaglia
3F – Glanymede Castle
| 1 | Pick up Scrap Meat x2 on top of the crate on the northeast corner of the room. Afterwards, exit the room go west and take out the enemies blocking the path (Wolves x2). |
|---|---|
| 2 | Go north again to find another room and pick up Scrap Meat x1 on the table. In the bedroom to the east is Orange Gel x1. |
| Exit the room and continue west to find more enemies guarding another room to the northwest(Calaglia Armored Soldier x2, Armadillo x1). | |
| 3 | Enter the room they were guarding and head to the bedroom to the northeast to find Orange Gel x1. |
| 4 | Backtrack to the main room and go to the room to the southwest to find a chest with Lifebottle x2. |
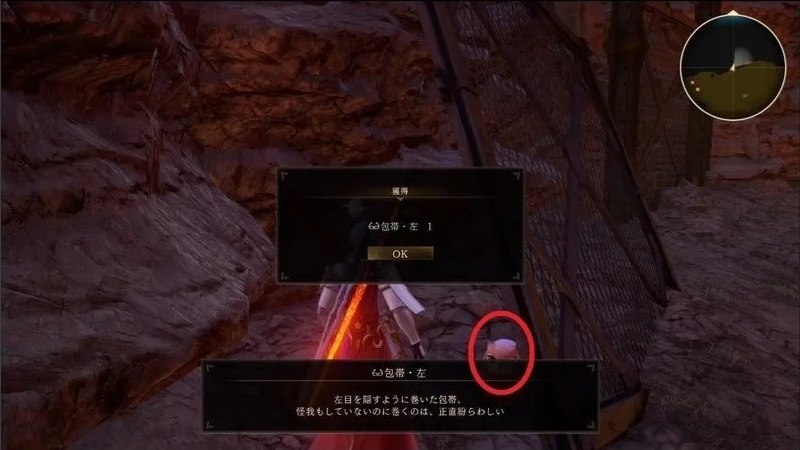
| 5 | Exit the room and back out onto the castle path again. Go southwest to another room to find Owl #8 near some chickens. Further at the back of the room among the shelves is Apple Gel x1. |
| 6 | Exit the room and walk along the path again going southeast. Enter the room to the south and defeat the enemies (Bees x3). Get the Jasmine x1 at the back of the room and go inside the bedroom to the west to get Orange Gel x1. |
| 7 | Exit the room and start going east and finally northeast while taking out the enemies along the way (ignore the stairs leading to the exit to the southeast for now). |
| 8 | Enter the room to the east and go inside the bedroom to the north. Check the shelf to find Castle Elevator Key x1. |
| 9 | Head into the bedroom to the south to get Apple Gel x1. Afterwards, head back out to the castle path again and take the exit up the stairs to the southeast. |
4F – Glanymede Castle – Ulzebek
| 1 | Immediately to your right is a Toxidillo Gigant Zeugle which you should be capable of taking on now. Read the tutorial on weak points and defeat the Toxidillo. Most of its attacks are linear dodging them should not be a problem. Attack the gigant’s tail after it has performed its rolling attack and go on the defensive again. When you have forced it into a break state, unload on it with artes and regular attacks to build up your combo for a boost strike. After defeating the Toxidillo, you will get an Astral Flower x1. |
|---|---|
| 2 | Move south and enter the room to the southeast to find a chest with Astral Crystal Grain. |
| 3 | Backtrack and continue following the circular path again by going west. |
| 4 | Take out the enemies (Armadillo x2) to the east. Just behind them is a mineral deposit with Paralaxstone x2. |
| 5 | You will find the elevator nearby to the west. Afterwards, go to the path north of that to find the entrance to the Lord’s Chamber with two soldiers guarding it. Ignore it first and continue north to find a wall of flame. Put it out using the Blazing Sword and open the chest ahead to get Garnet x1. |
| 6 | Head back to the entrance of the Lord’s Chamber and take out the guards. Afterwards, use the Savage Key to open the door. |
| 7 | Go up the stairs and watch the cutscene. |
| 8 | Prepare to battle Lord Balseph (view boss guide). |
| 9 | Watch the cutscene. Afterwards, you will get the Emissary of Liberation title for Alphen. |
| << Ulzebek – Fagan Ruins | Ulvhan Grotto – White Silver Plains >> |
Item Locations
Below are the in-game locations of the obtainable items in this walkthrough:
Coming soon.
Owl Locations
Below are the in-game locations of all owls in this walkthrough:
| Owl | Map | In-game |
|---|---|---|
| #4 (Kyrd Garrison) | 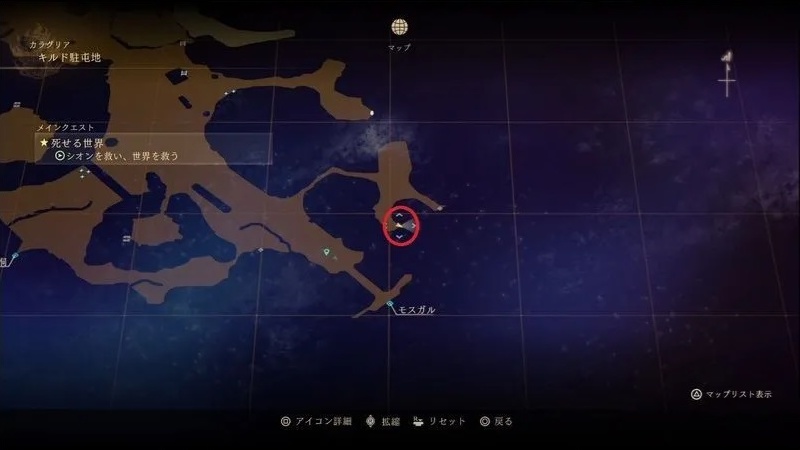 |
 |
| #5 (Mosgul) | 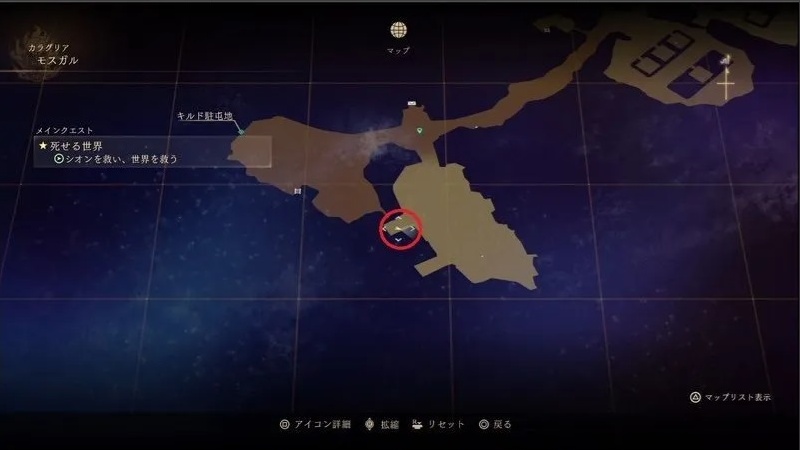 |
 |
| #6 (Trench of Flames – Castle Gates) | 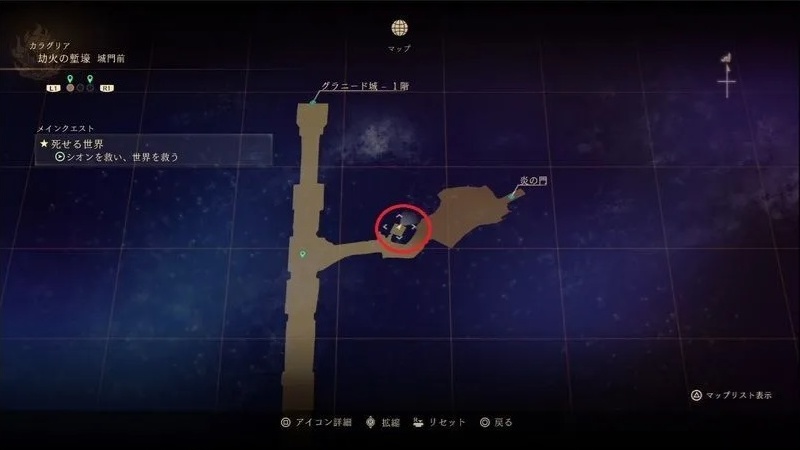 |
 |
| #7 (Trench of Flames – Gates of Fire) | 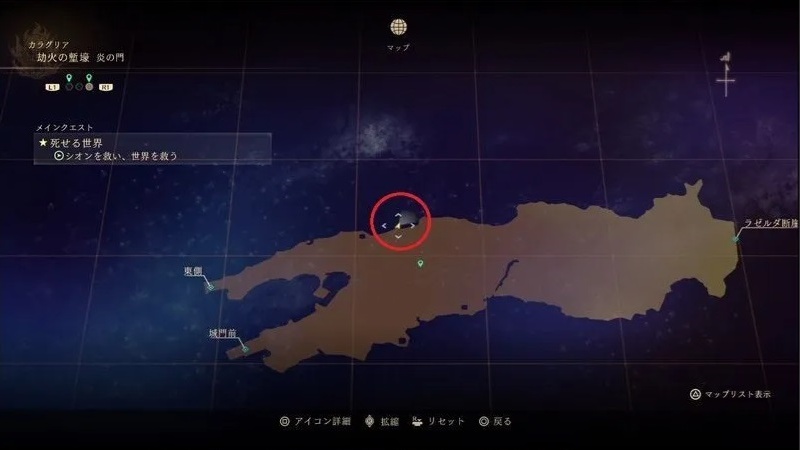 |
 |
| #7 (3F – Glanymede Castle) | 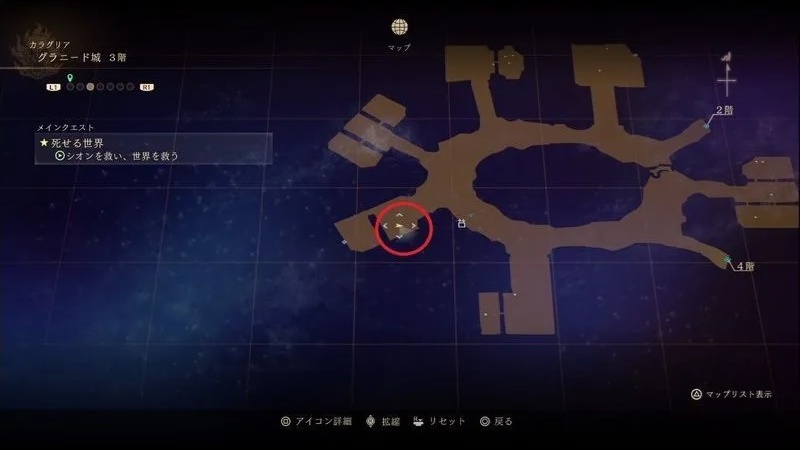 |
 |
Explored Locations
Coming soon.
Leave a Reply