

Mobile Fortress Gradia Walkthrough
This is the main story walkthrough and strategy guide for Mobile Fortress Gradia in Tales of Arise. Included also are lists of playable characters, obtainable items and collectibles, and normal and boss enemies.
Characters
Here are the playable characters in this walkthrough:
| Character | Availability |
|---|---|
| Alphen |
All Locations |
| Shionne |
All Locations |
| Rinwell |
All Locations |
| Law |
All Locations |
| Kisara |
All Locations |
| Dohalim |
All Locations |
Obtainable Items
Here is a list of items obtainable in this walkthrough:
| Item | Location |
|---|---|
| Magic Emblem x1 | Mobile Fortress Gradia Lower Level |
| White Cloak x1 | Mobile Fortress Gradia Lower Level |
| Resist Ring x1 | Mobile Fortress Gradia Ship Interior Level 2 |
| Natural Vest x1 | Mobile Fortress Gradia Ship Interior Level 2 |
| Knight Armor x1 | Mobile Fortress Gradia Ship Interior Level 4 |
Boss Enemies
Here is a list of boss enemies encountered in this walkthrough:
| Boss | Level | Type | Location |
|---|---|---|---|
| Lord Almeidra & Mesmald | 30 | Mobile Fortress Gradia Deck |
Mobile Fortress Gradia Walkthrough
Please note that this walkthrough is still undergoing updates.
Mobile Fortress Gradia
| 1 | Watch the cutscene. move forward and enter the room on your right. Open the chest to get Life Bottle x3. |
|---|---|
| 2 | Exit the room and go north to another room. Pick up Lettuce x3. |
| 3 | Leave the room and head for the center of the level. Take out the enemies along the way. When you come to the barrier, have Rinwell dispel it. Before going in, pick up Tomato x3 at one of the dead ends and 2850 gald at the other. |
| 4 | Enter the door that was previously sealed off by the barrier to find the elevator. To use it, you must find the key. |
| 5 | Exit to the hallway and take out the enemies along the way. Scour all of the rooms on the side to get 10,200 Gald and Milk x1, Beef, x3, Orange Gel x1, Peach Gel x1, and Access Key A x1 (by defeating the Red Guard in one of the rooms to the left). |
| 6 | Backtrack to the elevator and use the key. Then, head to the Lower Level. |
| 7 | Upon reaching the Lower Level, head west (ignore the area with the barrier for now) and take out the Red Guard to get Access Key B x1 on the desk. |
| 8 | Pick up Wolf Meat x3 and Happy Bottle x1 from the chest. |
| 9 | Backtrack to where you got off from the elevator and head for the barrier. Dispel it using Rinwell and take out the enemies. Afterwards, loot the chests to get Magic Emblem x1 and White Cloak x1. |
| 10 | Use the key to reach Ship Interior Level 2 via the elevator. |
| 11 | Upon arriving at Ship Interior Level 2, head to the room on the right for a cutscene. Afterwards, dispel the barrier on the right to find a chest with Resist Ring x1. |
| 12 | Go out and continue working your way across the neighboring rooms to get Potato x3 and 1150 Gald. |
| 13 | When you reach the last room along the left side, take out the enemies there. Afterwards, operate the control device to clear a path to Ship Interior Level 3 (east of the map) but do not head for the marked location yet. |
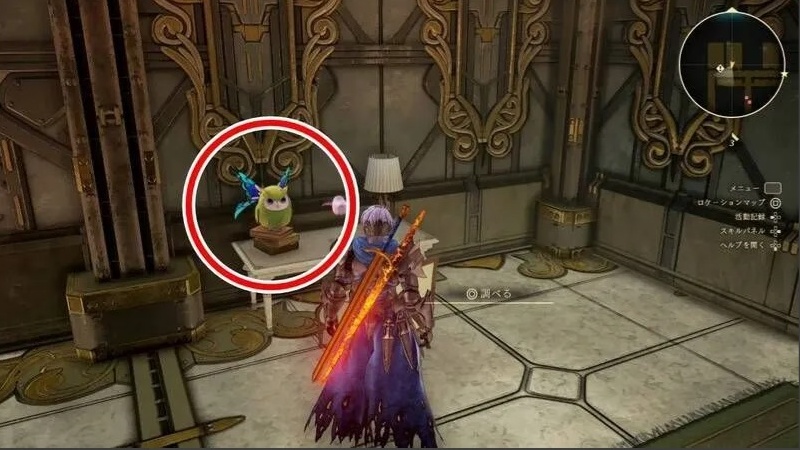
| 14 | Still on Ship Interior Level 2, head to the leftmost room and dispel the barrier. Open the chest to get Natural Vest x1. Afterwards, head to the next room directly east to find Owl #26 standing on top of a stack of books on the desk. If you defeat Almeidrea before finding the owl, it will reappear at the shore of Thistlym in Ganath Haros (you may need to clear the Owl’s Inn sub quest to make it reappear). |
| 15 | Enter the last remaining rooms to get Red Saffron x1 and 3100 Gald. From the very last room, head for the stairs at the middle and go down to get Apple x5 and Life Bottle x1. |
| 16 | After you are done exploring Ship Interior Level 2, go east toward the marked location. Before going inside the room, pick up Peach Gel x1 and Rice x3 by going around the path. |
| 17 | Dispel the barrier in the rom nearby. Then, go inside to get Elixir x1 from the chest. Afterwards, defeat the enemy in the middle of the room. |
| 18 | Head for the door (marked location) to trigger a cutscene. |
| 19 | Afterwards, exit to Ship Interior Level 4. |
| 20 | Head towards the path leading to the deck. Pick up 2600 Gald, Orange Gel x1, and Knight Armor x1 inside the chests along the way. |
| 21 | Take out the Vandal Dragon using water attacks. Afterwards, press the switch to dispel the barrier on Ship Interior Level 3. |
| 22 | Backtrack to the elevator and use it to reach Ship Interior Level 3. Get off and use the healing light to fully restore the party’s HP. Save if you want to as well. |
| 23 | Afterwards, proceed ahead and get ready to battle Lord Almeidrea and Mesmald. |
| 24 | Equip Opal (accessory) on characters to reduce the damage from the boss duo’s wind attacks. When the two foes separate, try to have both of them in view to dodge their attacks.
As with most gigant zeugles, Mesmald’s weakpoint is the glowing orange stone on its tail. Focus your offense on destroying it to trigger Mesmald into a Core Break state. As for Almeidrea, counter her spells (especially when she casts God’s Breath) using Rinwell’s boost attack as much as possible. Once Mezmeld moves to the center of the arena, move away and get ready to avoid its all-directional attack. After you have reduced Almeidrea’s HP to about half, she will go into the sky and will bombard you with attacks from above. Wait for her to finish her assault as you cannot directly damage her at this point. When both Almeidrea and Mesmald move to the center of the area, be ready to counter their mystic arte using Rinwell’s boost attack. |
| 25 | Watch the cutscene afterwards. |
| << Este Luvah Forest – Adan Ruins | Tua Seashore – Shinefall Woods >> |
Item Locations
Below are the in-game locations of the obtainable items in this walkthrough:
Coming soon.
Owl Locations
Below are the in-game locations of all owls in this walkthrough:
| Owl | Map | In-game |
|---|---|---|
| #26 (Mobile Fortress Gradia Ship Interior Level 2 or Thistlym if you did not find it before defeating Almeidrea) | 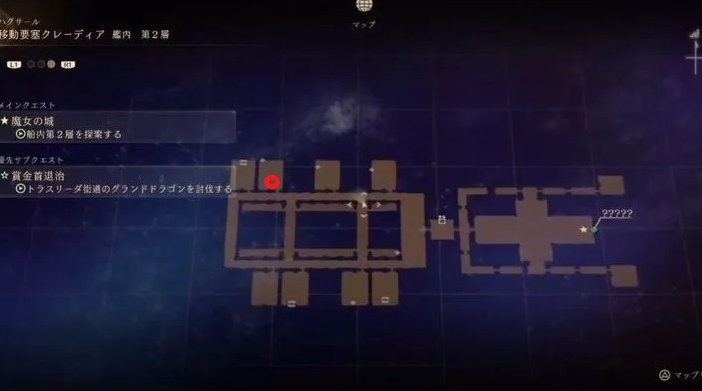 |
 |
Explored Locations
Coming soon.
Leave a Reply